
Page 114 - Distance-education-En-V3
P. 114
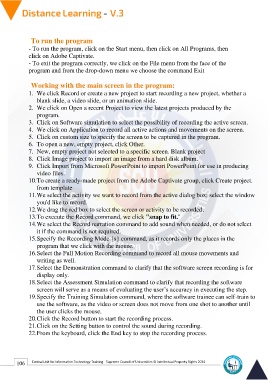
To run the program

     - To run the program, click on the Start menu, then click on All Programs, then
     click on Adobe Captivate.
     - To exit the program correctly, we click on the File menu from the face of the
     program and from the drop-down menu we choose the command Exit

      Working with the main screen in the program:

     1. We click Record or create a new project to start recording a new project, whether a
         blank slide, a video slide, or an animation slide.

     2. We click on Open a recent Project to view the latest projects produced by the
         program.

     3. Click on Software simulation to select the possibility of recording the active screen.
     4. We click on Application to record all active actions and movements on the screen.
     5. Click on custom size to specify the screen to be captured in the program.
     6. To open a new, empty project, click Other.
     7. New, empty project not selected to a specific screen. Blank project
     8. Click Image project to import an image from a hard disk album.
     9. Click Import from Microsoft PowerPoint to import PowerPoint for use in producing

         video files.
     10.To create a ready-made project from the Adobe Captivate group, click Create project.

         from template
     11.We select the activity we want to record from the active dialog box: select the window

         you'd like to record.
     12.We drag the red box to select the screen or activity to be recorded.
     13.To execute the Record command, we click "snap to fit."
     14.We select the Record narration command to add sound when needed, or do not select

         it if the command is not required.
     15.Specify the Recording Mode {s} command, as it records only the places in the

         program that we click with the mouse.
     16.Select the Full Motion Recording command to record all mouse movements and

         writing as well.
     17.Select the Demonstration command to clarify that the software screen recording is for

         display only.
     18.Select the Assessment Simulation command to clarify that recording the software

         screen will serve as a means of evaluating the user’s accuracy in executing the step.
     19.Specify the Training Simulation command, where the software trainee can self-train to

         use the software, as the video or screen does not move from one shot to another until
         the user clicks the mouse.
     20.Click the Record button to start the recording process.
     21.Click on the Setting button to control the sound during recording.
     22.From the keyboard, click the End key to stop the recording process.

106 Central Unit for Information Technology Training - Supreme Council of Universities © Intellectual Property Rights 2024