
Page 59 - Distance-education-En-V3
P. 59
1 Audio Effects Tab: Click here to access the Audio Effects.
2 Enable Noise Removal: Enable this feature to reduce background noise in
your
audio timeline. Once enabled, the color of the audio changes from green to
orange while in the Audio tab.
a. Advanced Option: Open additional options to manually set the noise
removal feature, allowing you to adjust mouse click sounds and fix
clipping.
3 Enable Volume Leveling: Click to turn on. Use this option when the
recording level between clips varies.
a. Select an option from the Volume Variation drop-down menu
which will best describe the level of the audio variation that exists
on the timeline.
(If you select Custom settings from the drop-down, you will have 3
options, Ratio, Threshold, and Gain.)
4 Audio Fade In or Fade Out: Use this feature to Fade In or Fade out one
selected audio clip, multiple audio clips, a single selection of an audio clip,
or several selected audio clips. To adjust the fade, grab the audio point and
drag it. The
waveform adjusts accordingly.
5 Audio Properties: Allows you to access additional properties for each effect.
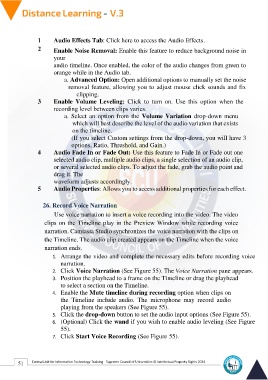
26. Record Voice Narration
Use voice narration to insert a voice recording into the video. The video
clips on the Timeline play in the Preview Window while recording voice
narration. Camtasia Studio synchronizes the voice narration with the clips on
the Timeline. The audio clip created appears on the Timeline when the voice
narration ends.
1. Arrange the video and complete the necessary edits before recording voice
narration.
2. Click Voice Narration (See Figure 55). The Voice Narration pane appears.
3. Position the playhead to a frame on the Timeline or drag the playhead
to select a section on the Timeline.
4. Enable the Mute timeline during recording option when clips on
the Timeline include audio. The microphone may record audio
playing from the speakers (See Figure 55).
5. Click the drop-down button to set the audio input options (See Figure 55).
6. (Optional) Click the wand if you wish to enable audio leveling (See Figure
55).
7. Click Start Voice Recording (See Figure 55).
51 Central Unit for Information Technology Training - Supreme Council of Universities © Intellectual Property Rights 2024